What is Clampit?
Clampit is a free mastering limiter for Mac and Windows. It sits last on your master or a bus and sets a ceiling your audio can't cross, so you can make a track louder without it clipping. Three knee characters go from clean and transparent to saturated, and built-in LUFS metering shows how loud the result is.
Input drives your sound into the limiter, which uses a short lookahead and 4x oversampled true-peak detection to catch peaks before they pass the Ceiling. After the limiter, LINK can turn the level back down by the amount you added at the Input, for a fair comparison, and optional dither runs as the final audio stage.
How does limiting work?
A limiter is a compressor with a very high ratio. It watches the incoming level and pulls it down the moment a peak would cross the ceiling. Because the ratio is so steep, almost nothing gets through above that ceiling. A lookahead lets the limiter see peaks before they arrive and catch them more cleanly, at the cost of a small delay that your DAW compensates for automatically.
Quick start
Get a result with Clampit in under a minute.
- Insert it. Put Clampit on the track or bus you want to process.
- Pick a preset. Open the Presets menu and choose one close to what you want.
- Shape it. Work through the numbered controls below until it sounds right to your ear.
- Listen to the difference. Switch on DELTA to hear only what the plugin is adding, then switch it off.
- Compare. Bypass the plugin in your DAW to hear before and after.
The interface
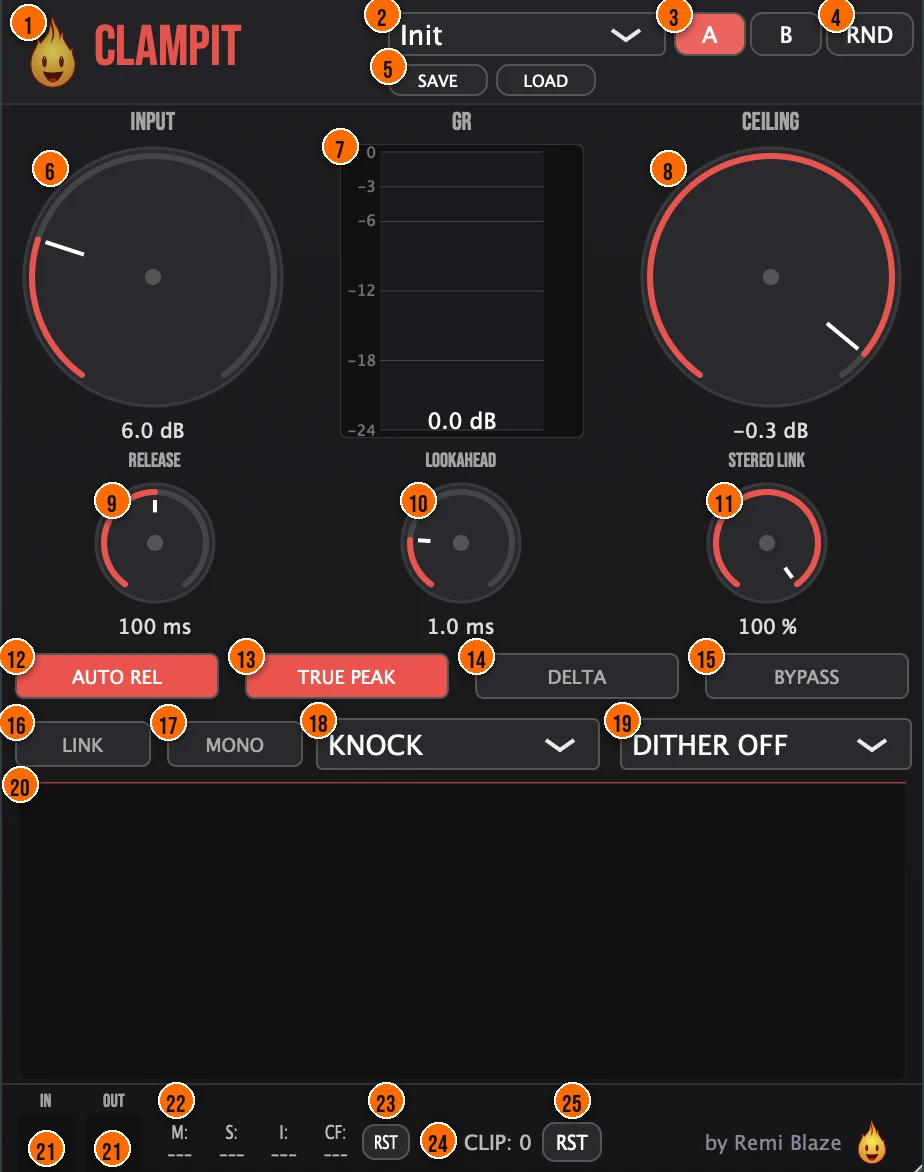
Controls
Top bar

- 1Fire Head: click the flame logo to open the About panel: what the plugin is, who made it, its version and the trademark notices. Click anywhere in the panel to close it.
- 2Presets: 15 factory presets, from Init and Main Stage Master to Streaming Safe, Broadcast and Remi Blaze Limit.
- 3A / B: compare two versions of your settings.
- 4RND (Randomize): randomizes the settings, for a new starting point.
- 5Save / Load: save your own presets, or load them back.
Limiter
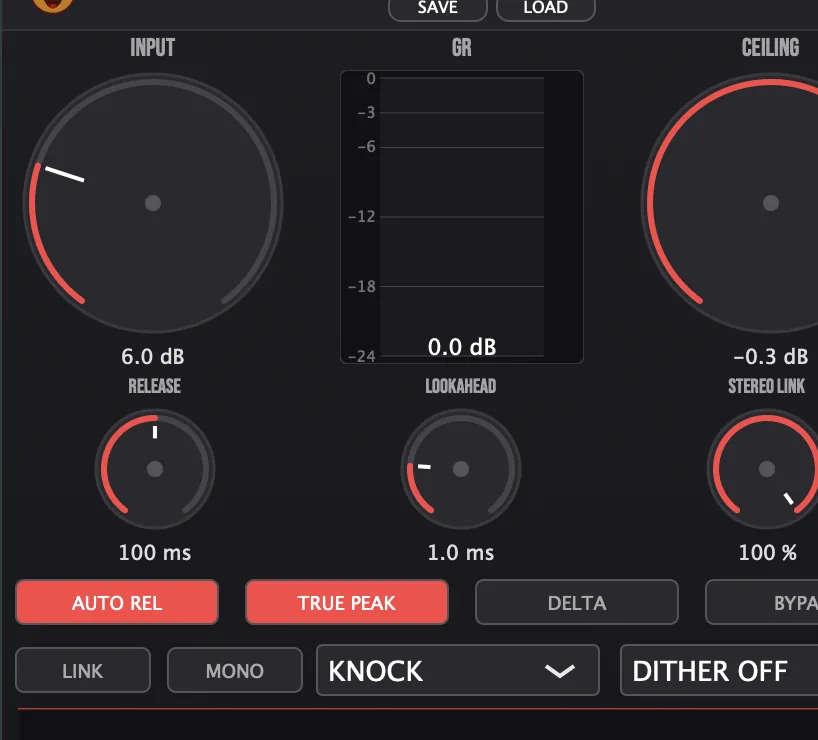
- 6Input: drives your sound into the limiter. The more you add, the louder the result and the more the limiter works.0 to +24 dBTip Raise Input to push more signal into the limiter. The more you push, the louder and denser the result.
- 8Ceiling: the highest level the output can reach. Audio never goes above it.−6.0 to 0.0 dBTip For streaming, set Ceiling to -1.0 dB. For club playback, -0.3 dB keeps more loudness.
- 9Release: how fast the limiter lets go after a peak, when AUTO REL is off. Slower holds on longer; faster recovers quickly but can pump.1 to 1000 msTip Shorter release is more transparent on fast transients. Longer release smooths out pumping on sustained material.
- 10Lookahead: lets the limiter see peaks before they arrive and react in time. Clampit reports the latency to your DAW, which compensates for it.0 to 5 msTip More lookahead catches peaks more cleanly but adds latency. Your DAW compensates automatically.
- 11Stereo Link: at 100%, both channels respond to the louder peak, which keeps the stereo image stable. At 0%, the left and right channels are limited independently.0 to 100%, default 100%
- 12AUTO REL (Auto Release): a program-dependent release that speeds up on transients and slows down on sustained material, following the crest factor and how deep the gain reduction goes.
- 13TRUE PEAK: 4x oversampled detection of the peaks between samples, which a plain sample-peak meter misses, so the master stays under the Ceiling after conversion or streaming.
- 18Knee: the limiting character. KNOCK is a hard knee: transparent and precise. GLUE is a 6 dB soft knee for smoother, more musical limiting. CLOBBER is a hard knee with tanh saturation that adds harmonic color as the gain reduction increases. Switching knees crossfades over about 20 ms, so it doesn't click.KNOCK, GLUE or CLOBBERTip KNOCK is surgical and clean. GLUE rounds the onset for a musical feel. CLOBBER adds harmonic grit.
Compare and check
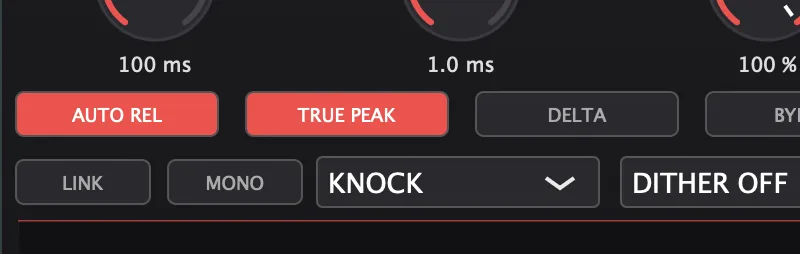
- 14DELTA: plays only what the limiter removes, so you can hear whether it is cutting into the body of the sound.Tip Switch on DELTA to hear only what the limiter is removing, then switch it off.
- 15BYPASS: a loudness-matched bypass, for an honest comparison.
- 16LINK (Constant Loudness): after the limiter, turns the level down by the amount you add with Input, so you compare the limiting character and not just the extra volume.Tip Switch on LINK to match the output level to the input, so you judge the sound, not the volume.
- 17MONO (Mono Check): sums the left and right channels to mono, to check the low end and phase. The LUFS readouts follow the mono signal while it is on.
Export
- 19Dither: TPDF dither for a clean reduction in bit depth when you export, as the last stage of the audio.Off, 16-bit or 24-bitTip Turn on Dither when bouncing to 16-bit for CD or MP3. Leave it off for 24-bit or 32-bit float exports.
Meters and displays
- 7GR meter: how much the limiter is turning the level down right now, on a scale from 0 to −24 dB, with the value below it.
- 20Gain reduction trace: a scrolling history of the gain reduction, with a peak hold line.
- 21IN and OUT meters: the input and output levels.
- 22M, S, I and CF readouts: Momentary (400 ms), Short-term (3 s) and Integrated (gated) loudness in LUFS, K-weighted to BS.1770, and the crest factor. The Integrated reading glows teal between −8 and −7 LUFS. The crest factor is color-coded: green for 6 to 8 dB, yellow for 4 to 6 dB, red under 4 dB.
- 23RST (loudness): resets the Integrated (I) loudness reading, for a fresh measurement.
- 24Clip counter: goes up when the output reaches the Ceiling with TRUE PEAK on. Zero at your chosen Ceiling means the master stays under it.
- 25RST (clips): sets the clip counter back to zero.
Key specs*
| Limiter | Lookahead, true peak, three knees (KNOCK, GLUE, CLOBBER) |
|---|---|
| True peak | 4x polyphase IIR oversampling |
| Lookahead | 0 to 5 ms, reported to your DAW |
| Ceiling | −6.0 to 0.0 dB |
| Release | 1 to 1000 ms, or program-dependent Auto Release |
| Loudness | LUFS-M (400 ms), LUFS-S (3 s), LUFS-I (gated), K-weighted to BS.1770 |
| Dither | TPDF, 16-bit or 24-bit |
| Output | 5 Hz DC blocker |
| Factory presets | 15 |
* Key specs from the plugin page. Some specs may not be listed.
How does the sound flow through Clampit?
A simplified view of the main path.
Loudness normalization
Clampit's Integrated readout glows teal between −8 and −7 LUFS, which is a loud master. Many playback systems play every track at the same loudness, so a master louder than the playback target is turned down by the difference.
All three play back at the same loudness. Master A gave up the most dynamics to be loud and gains nothing for it. Use LINK and BYPASS to hear that trade before you export: compare at matched loudness and keep only the limiting that sounds better.
How do I master a track for club playback with Clampit?
- Load it last. Insert Clampit as the last plugin on your master bus and load the Main Stage Master preset.
- Drive it. Raise Input, starting at 2 to 4 dB, until the gain reduction trace shows steady gain reduction on the peaks.
- Compare fairly. Press LINK, then toggle BYPASS: you hear the limiting character without the louder-is-better bias.
- Read the loudness. Press RST, play the whole track and watch the Integrated (I) reading. It glows teal between −8 and −7 LUFS.
- Watch the dynamics. If the crest factor turns yellow or red, back off Input or switch the knee to GLUE.
- Check mono. Turn on MONO. If the Integrated reading drops a lot, fix the low end's phase before you export.
How do I glue a drum bus with Clampit?
- Insert it. Put Clampit on your drum bus, after any EQ or compression.
- Pick GLUE. Set Knee to GLUE for a smooth, musical onset.
- Push gently. Raise Input by 2 to 4 dB. You want 1 to 3 dB of gain reduction on the peaks.
- Set the ceiling. Lower Ceiling to -0.3 dB so the bus peaks stay under control.
- Listen to the difference. Switch on DELTA to hear what the limiter is shaving off, then switch it off and compare.
What about Clampit Raw?

Clampit Raw is the free one-knob version, on the same limiter engine. Its CLAMP knob drives the limiter and lowers the ceiling together, from gentle peak control at low settings to a tighter, denser sound near the top. Constant Loudness is always on, so every position stays level-matched, and its latency is fixed. Its own manual: Clampit Raw manual.
Clampit vs. Clampit Raw
A side-by-side look at what each version includes.
| Feature | Clampit | Clampit Raw |
|---|---|---|
| Presets | Included | Not included |
| Randomize | Included | Not included |
| Delta / listen mode | Included | Not included |
| Mono check | Included | Not included |
Keyboard and mouse shortcuts
These work in every Clampit format (AU, VST3, CLAP, AAX, Standalone).
| Reset a control to its default | Double-click the knob or slider |
|---|---|
| Scroll to change a value | Hover over a knob and scroll the mouse wheel |
Frequently Asked Questions
Which knee should I start with?
KNOCK for a transparent, precise ceiling. GLUE if the limiting sounds squashed, because the soft knee recovers dynamics more gracefully. CLOBBER when you want the limiter to add saturation and color as it works.
Should I use Auto Release or the Release knob?
AUTO REL adapts to the music: faster on transients, slower on sustained parts. Turn it off and use Release when you want a fixed time. A slower release holds on longer; a faster one recovers quickly but can pump.
What does Stereo Link change?
At 100%, the default, both channels respond to the louder peak, so the stereo image stays stable under heavy limiting. Lower it toward 0% to limit the left and right independently, which can help when the channels are unbalanced.
When should I turn on dither?
When you export at a lower bit depth than you work in. Choose 16-bit or 24-bit to match your export. Clampit applies it as the last stage of the audio.
Why does my master sound smaller after upload?
Most playback systems normalize loudness automatically, so a louder master gets turned down to the same level as everything else. The extra loudness you pushed for disappears, and you lose dynamics in the process. Use LINK plus BYPASS to compare at matched loudness in Clampit before you export, so you hear what the limiting actually does to the sound, not just the extra volume.
Where can I find more about Clampit?
On the Clampit page: its features, system requirements and how to get it.
How do I get and install Clampit?
- Get it. Clampit is free. Get it from the Clampit page.
- Run the installer. On macOS, double-click the .pkg file and choose AU, VST3, CLAP, AAX or Standalone. On Windows, run the .exe installer and choose VST3, CLAP or Standalone.
- Open your DAW. Restart your DAW and rescan plugins if needed, then find Clampit under Remi Blaze in your plugin list.
More about Clampit, including its features and system requirements, is on the Clampit page.
Where are the plugin files?
If you need to find Clampit on disk, for example to troubleshoot or to uninstall it manually, these are the standard locations.
| macOS AU | ~/Library/Audio/Plug-Ins/Components/ |
|---|---|
| macOS VST3 | ~/Library/Audio/Plug-Ins/VST3/ |
| macOS CLAP | ~/Library/Audio/Plug-Ins/CLAP/ |
| macOS AAX | /Library/Application Support/Avid/Audio/Plug-Ins/ |
| Windows VST3 | C:\Program Files\Common Files\VST3\ |
| Windows CLAP | C:\Program Files\Common Files\CLAP\ |
To uninstall, quit your DAW and delete the Clampit file from the relevant folder. Your DAW will stop listing it on its next rescan.
Need help with Clampit?
If something isn't covered here, or Clampit doesn't behave as described, contact support or email support@remiblaze.com. To get an answer faster, include:
- your operating system and version (for example macOS 15.6 or Windows 11)
- your DAW and its version
- the format you're using (AU, VST3, CLAP, AAX or Standalone)
- the Clampit version, shown in the About panel (click the Fire Head)
- what you did, what you expected, and what happened instead
This manual is for Clampit 1.1.0. Controls and settings can change between versions, so if something here doesn't match what you see, check which version you have: click the Fire Head to open Clampit's About panel. Spotted a mistake or have a question? Let us know.