What is Cleansix?
Cleansix is a resonance suppressor for Mac and Windows. It finds the harsh, boxy or ringing frequencies in your sound and pulls only those down, so vocals, cymbals and mixes stop sounding fatiguing without losing their tone.
An STFT analysis listens in real time, and a bank of 16 notch filters is assigned to the resonances it finds. A 2 ms lookahead ducks the notches on drum and percussive attacks, so the punch stays. Focus bands aim the detector, Mojo can add warmth back, and a health score shows the before and after.
How does dynamic resonance suppression work?
A resonance is a narrow frequency peak that rings when excited. Cymbal hits, vocal sibilance and room modes can all produce harsh resonances that stick out of a mix. A static notch filter cuts one frequency permanently, but resonances move, so a static cut either misses the ringing or removes wanted tone.
Cleansix uses a hybrid detect-then-notch approach: an FFT analysis finds the resonances in real time and assigns narrow IIR notch filters to suppress them. Because the notches track the signal, they cut only while the resonance is present and release when it fades. A hysteresis threshold prevents the notches from chattering on and off.
Quick start
Get a result with Cleansix in under a minute.
- Insert it. Put Cleansix on the track or bus you want to process.
- Pick a preset. Open the Presets menu and choose one close to what you want.
- Shape it. Work through the numbered controls below until it sounds right to your ear.
- Listen to the difference. Switch on DELTA to hear only what the plugin is adding, then switch it off.
- Blend to taste. Pull Mix back from 100% if you want a subtler result.
- Compare. Bypass the plugin in your DAW to hear before and after.
The interface
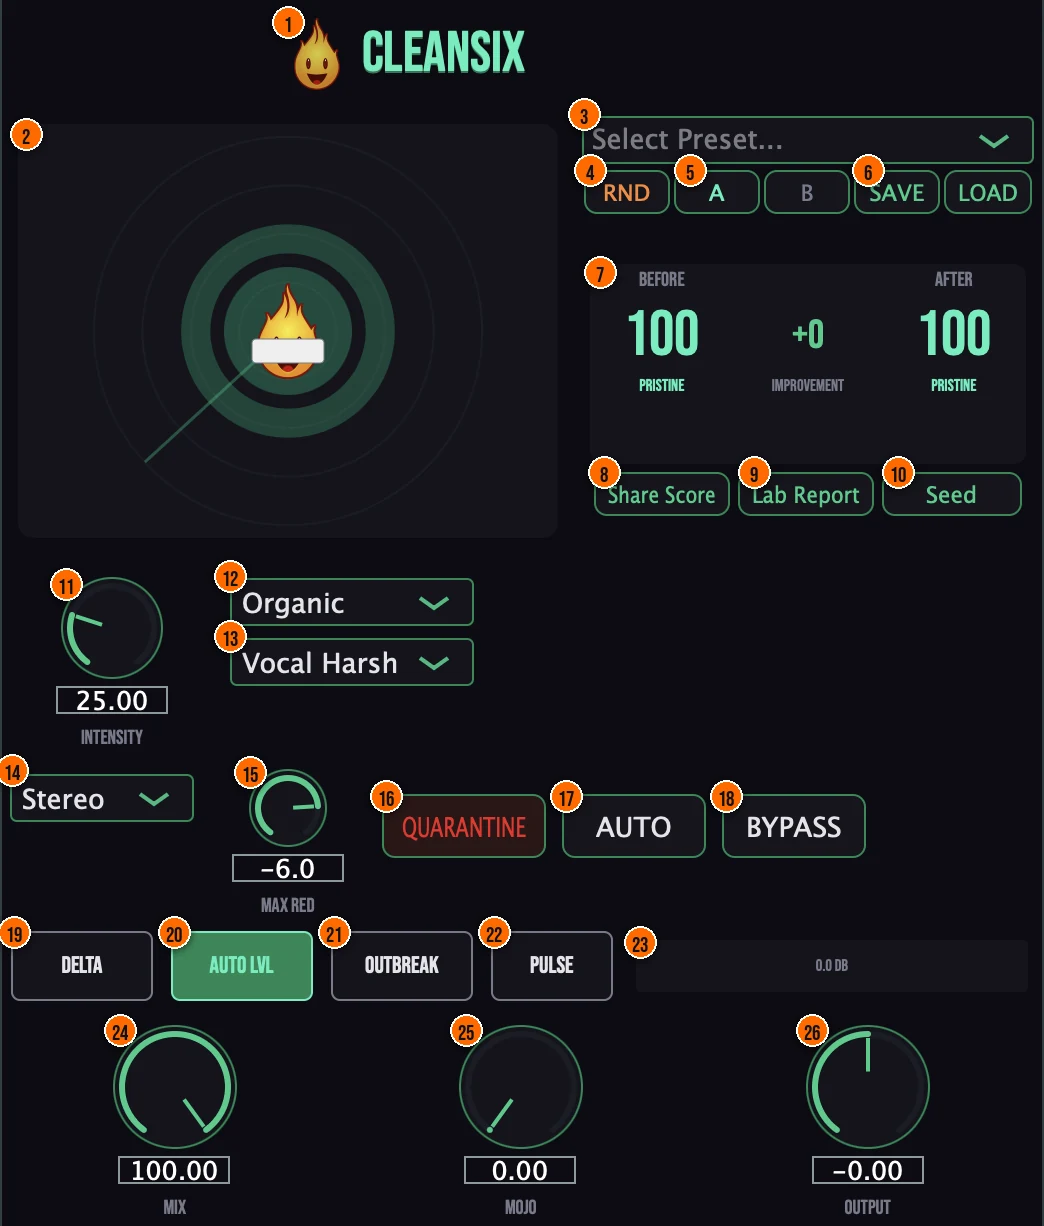
Controls
Top bar
- 1Fire Head: click the flame logo to open the About panel: what the plugin is, who made it, its version and the trademark notices. Click anywhere in the panel to close it.
Presets and sharing
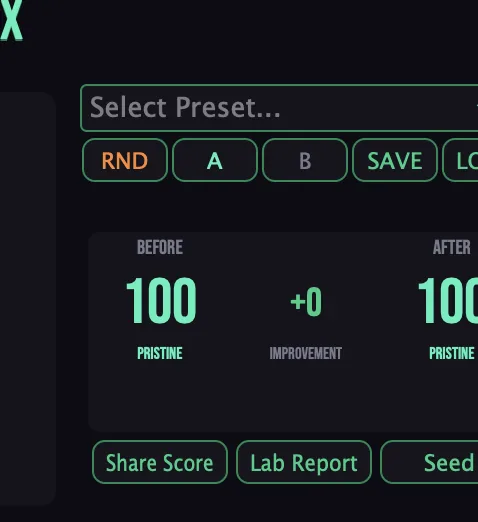
- 3Presets: 15 factory presets, from Sibilance Surgeon and Cymbal Tamer to The Box Cutter, Vocal De-Harsh and Aggressive Fix.
- 4RND (Randomize): new settings at random, for creative exploration.
- 5A / B: compare two versions of your settings.
- 6Save / Load: save your own presets, or load them back.
- 8Share Score: for sharing your health score result, the Before and After scores.
- 9Lab Report: copies a text summary of the analysis, with the resonance data and health scores.
- 10Seed (Diagnosis Seed): your exact settings as a compact hex string with a checksum, for sharing.
Detection
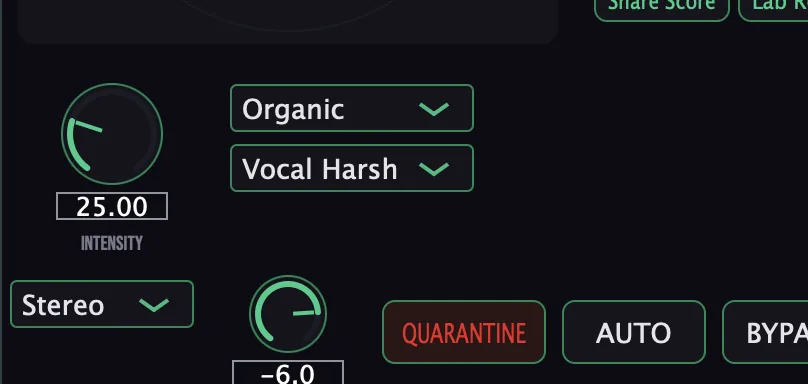
- 11Intensity: the detection sensitivity: how readily Cleansix treats a peak as a resonance.0 to 100%, default 25%Tip Start with Intensity around 30–40% and raise it until the harshness fades. Pushing it too high can make the sound thin.
- 12Speed mode: Surgical tracks fast and tight; Organic is gentler and more musical.Surgical, Organic; default OrganicTip Use Surgical for fast, precise tracking on individual tracks. Switch to Organic on a bus where gentler, slower movement sounds more natural.
- 13Focus band: aims the detector at a problem area: Vocal Harsh (2 to 5 kHz), Cymbal Ring (5 to 10 kHz), Box (300 to 800 Hz), Full Range, or Custom, which uses manual low and high knobs.Vocal Harsh, Cymbal Ring, Box, Full Range, Custom; default Vocal HarshTip Choose the focus band that matches the problem: Vocal Harsh for sibilance, Cymbal Ring for overheads, Box for room honk. Custom lets you set the range manually.
- 14Stereo / Mid / Side: process the whole stereo signal, the mid only or the side only.Stereo, Mid, Side; default Stereo
- 15Max Red (Max Reduction): the per-notch gain floor: the most any one notch can cut.−18 to −3 dB, default −6 dBTip Max Reduction is the deepest any one notch can cut. Keep it shallow (toward −3 dB) when you want the cleanup to stay transparent.
- 16Quarantine: a momentary intensity boost while you hold it, for aggressive spot treatment.Tip Hold Quarantine to temporarily boost suppression for an aggressive spot-treatment on one phrase, then release to return to normal.
- 17Auto (Auto-Threshold): Auto-Threshold: a one-click, 5-second capture of your source that sets the focus band and intensity, then freezes the health scores as a verified baseline.Tip Press Auto and let five seconds of the loudest section play. It sets the focus band and intensity for that material, then freezes the baseline.
- 18Bypass: true bypass, for comparing against the dry signal.
Monitoring and character
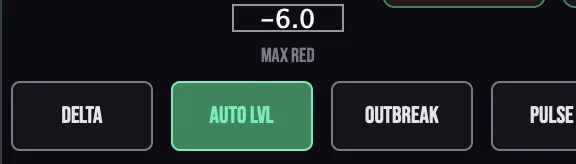
- 19Delta: hear only what Cleansix removes, through a 150 Hz to 10 kHz band-pass ghost filter.Tip Turn on Delta to hear only what Cleansix is removing. If you hear the body of the sound, back off Intensity or narrow the focus band.
- 20Auto Lvl (Auto-Level): automatic gain compensation, so the cleaned sound isn't judged by a level change. It is on by default.
- 21Outbreak: a full-spectrum view with a parallel exciter that boosts the detected resonances, kept safe from inter-sample peaks at −0.3 dBFS.
- 22Pulse (Pulse Scan): syncs the radar sweep to your DAW's tempo: while the transport plays, the sweep line turns once per bar (in 4/4).
Output

- 24Mix: blends the cleaned sound with the dry signal. The dry path is aligned for latency, so the blend stays in phase.0 to 100%, default 100%
- 25Mojo: a harmonic enhancer that adds 2nd and 3rd harmonics, oversampled, to bring back warmth if the cleanup sounds sterile.0 to 100%, default 0%Tip After suppression, the signal can sound slightly sterile. A small amount of Mojo adds harmonic warmth to compensate without undoing the cleanup.
- 26Output: the output trim.−6 to +6 dB, default 0 dB
Meters and displays
- 2Radar display: a sweep line, target dots and zap beams show the detection at work. The Fire Head in the center wears a surgeon's mask, the white band across its face.
- 7Health score: Before, Improvement and After scores, weighted to the ear's sensitivity (Fletcher-Munson), each with a status label from CRITICAL to PRISTINE. After Auto-Threshold, the scores freeze as a verified snapshot and IMPROVEMENT reads VERIFIED.
- 23Reduction meter: the total suppression in dB, color coded.
- Alerts and streak: Cleansix also has an infection alert and a clean streak synced to the transport.
Key specs*
| Engine | STFT detection with 16 dynamic notch filters (IIR biquads) |
|---|---|
| Analysis | 1024-point FFT, 256-sample hop, Hann window |
| Response | 3 ms attack, 100 ms release; a resonance must persist about 15 ms |
| Transients | 2 ms lookahead ducks the notches on attacks |
| Focus bands | Vocal Harsh 2 to 5 kHz, Cymbal Ring 5 to 10 kHz, Box 300 to 800 Hz, Full Range, Custom |
| Processing | Stereo, Mid or Side |
| Delta filter | 150 Hz to 10 kHz band-pass |
| Safety | Soft clipper, hard output limit, ISP safety limiter |
| Parameters | 20 ms smoothing |
| Factory presets | 15 |
* Key specs from the plugin page. Some specs may not be listed.
How does the sound flow through Cleansix?
A simplified view of the main path.
Focus bands aim the detector at a frequency range. Quarantine locks a filter to one resonance, and Pulse Scan sweeps for hard-to-find peaks.
How do I tame a harsh vocal with Cleansix?
- Load it. Put Cleansix on the vocal and play a loud, harsh part.
- Let it listen. Press Auto and let it capture 5 seconds. It sets the focus band and intensity for you. Or choose Vocal Harsh in the focus band menu.
- Choose the speed. Pick Surgical for tight tracking, or Organic for a gentler result.
- Set the amount. Adjust Intensity and Max Red until the harshness drops.
- Check it. Switch on Delta. You should hear only the harsh edge, nothing musical. Then switch it off.
- Finish. Switch on Auto Lvl, add a little Mojo if the vocal sounds sterile, and set Mix.
How do I tame cymbal ring on overhead mics with Cleansix?
- Insert Cleansix. Put Cleansix on the overhead track or bus.
- Set the focus. Select the Cymbal Ring focus band. It aims the detector at 5 to 10 kHz.
- Calibrate. Press Auto and play a loud section with plenty of cymbal hits. Cleansix sets the threshold and intensity.
- Check with Delta. Turn on Delta to hear only the removed signal. You should hear ringing, not the body of the cymbals.
- Adjust. If too much cymbal body comes through Delta, lower Intensity or set Max Red closer to −3 dB to limit the cuts.
- Add Mojo if needed. If the overheads sound a little dull after treatment, raise Mojo slightly to restore harmonic presence.
What about Cleansix Raw?

Cleansix Raw is the free one-knob version, on the same dynamic notch engine. Its CLEAN knob scales the suppression, from catching the worst offenders at low settings to deeper notches and a more sensitive detector further up. The output is auto-leveled, and its 2 ms lookahead is reported to your DAW. Its own manual: Cleansix Raw manual.
Cleansix vs. Cleansix Raw
A side-by-side look at what each version includes.
| Feature | Cleansix | Cleansix Raw |
|---|---|---|
| Presets | Included | Not included |
| Randomize | Included | Not included |
| Mix (dry/wet) | Included | Not included |
| Output level | Included | Not included |
| Delta / listen mode | Included | Not included |
Keyboard and mouse shortcuts
These work in every Cleansix format (AU, VST3, CLAP, AAX, Standalone).
| Reset a control to its default | Double-click the knob or slider |
|---|---|
| Scroll to change a value | Hover over a knob and scroll the mouse wheel |
| Type an exact value | Click the value below a knob and type a number |
Frequently Asked Questions
What is the difference between Surgical and Organic?
Surgical tracks resonances fast and tight. Organic is gentler and more musical.
What does Quarantine do?
It boosts the intensity for as long as you hold it, for aggressive spot treatment of a problem moment.
What does Outbreak do?
It shows the full spectrum and adds a parallel exciter that boosts the detected resonances, kept safe at −0.3 dBFS.
How do I share my settings?
Use Seed: the Diagnosis Seed shares your exact settings as a compact hex string with a checksum. Lab Report copies a text summary of the analysis and health scores.
Where can I find more about Cleansix?
On the Cleansix page: its features, system requirements and how to get it.
Related guides
How do I buy and install Cleansix?
- Buy it. Cleansix is a one-time purchase. Buy it from the Cleansix page, and the store emails you the download link.
- Run the installer. On macOS, double-click the .pkg file and choose AU, VST3, CLAP, AAX or Standalone. On Windows, run the .exe installer and choose VST3, CLAP or Standalone.
- Open your DAW. Restart your DAW and rescan plugins if needed, then find Cleansix under Remi Blaze in your plugin list.
More about Cleansix, including its features and system requirements, is on the Cleansix page.
Where are the plugin files?
If you need to find Cleansix on disk, for example to troubleshoot or to uninstall it manually, these are the standard locations.
| macOS AU | ~/Library/Audio/Plug-Ins/Components/ |
|---|---|
| macOS VST3 | ~/Library/Audio/Plug-Ins/VST3/ |
| macOS CLAP | ~/Library/Audio/Plug-Ins/CLAP/ |
| macOS AAX | /Library/Application Support/Avid/Audio/Plug-Ins/ |
| Windows VST3 | C:\Program Files\Common Files\VST3\ |
| Windows CLAP | C:\Program Files\Common Files\CLAP\ |
To uninstall, quit your DAW and delete the Cleansix file from the relevant folder. Your DAW will stop listing it on its next rescan.
Need help with Cleansix?
If something isn't covered here, or Cleansix doesn't behave as described, contact support or email support@remiblaze.com. To get an answer faster, include:
- your operating system and version (for example macOS 15.6 or Windows 11)
- your DAW and its version
- the format you're using (AU, VST3, CLAP, AAX or Standalone)
- the Cleansix version, shown in the About panel (click the Fire Head)
- what you did, what you expected, and what happened instead
This manual is for Cleansix 1.1.0. Controls and settings can change between versions, so if something here doesn't match what you see, check which version you have: click the Fire Head to open Cleansix's About panel. Spotted a mistake or have a question? Let us know.