What is Flarex?
Flarex is a free stereo imaging plugin for Mac and Windows. It takes a sound from full mono up to 200% width, keeps the low end mono and centered, and shows you the stereo picture as you work, so you can go wide without losing your mix in mono.
Flarex works in mid/side. Width narrows or widens the image, Mid and Side boost or cut the center and the stereo content, and Bass Mono folds the low end to mono below a frequency you set. A phase safety net watches the correlation the whole time and eases the width back if it gets risky. At the output, a hard limiter guards every sample.
How does mid/side width work?
Mid/side processing splits a stereo sound into the mid, what the left and right channels share, and the side, the difference between them. Turning the side down narrows the sound toward mono; turning it up widens it.
Up to 100%, Flarex narrows and widens on a power-constant law, so the loudness stays steady as you move Width. Above 100%, it adds width with cascaded all-pass decorrelation, which survives a mono fold-down without phase cancellation.
Quick start
Get a result with Flarex in under a minute.
- Insert it. Put Flarex on the track or bus you want to process.
- Pick a preset. Open the Presets menu and choose one close to what you want.
- Shape it. Work through the numbered controls below until it sounds right to your ear.
- Compare. Bypass the plugin in your DAW to hear before and after.
The interface
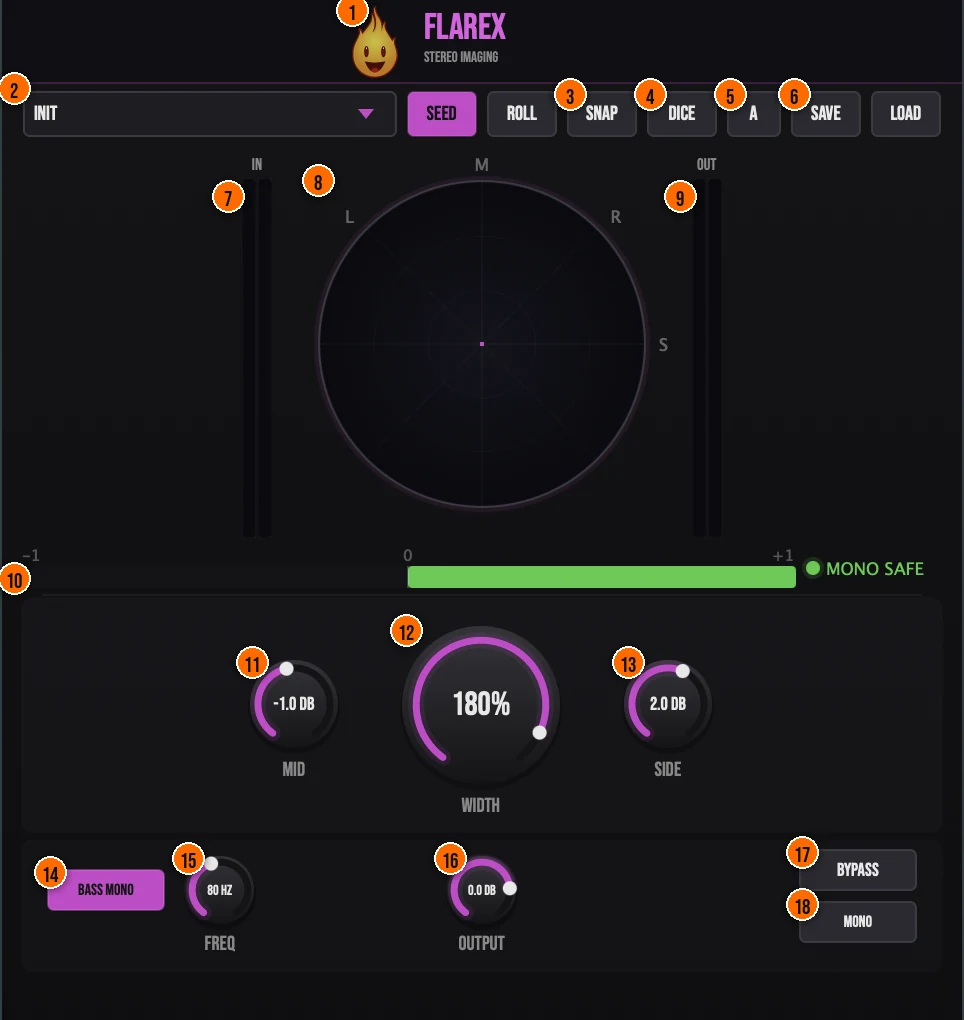
Controls
Top bar

- 1Fire Head: click the flame logo to open the About panel: what the plugin is, who made it, its version and the trademark notices. Click anywhere in the panel to close it.
- 2Presets: 11 factory presets, from Mono and Subtle Wide to Wide Pads, Bass Mono Only and Remi Blaze Width. Preset changes crossfade, so they don't click.
- 3SNAP (Capture Snapshot): takes a snapshot of the current stereo image: the density heatmap and the correlation. It stays in the vectorscope as a ghost overlay, with a signed readout of how far the correlation has moved, so you can compare as you tweak. A GHOST slider sets how visible the overlay is.Tip Press SNAP before you change anything. The ghost overlay then shows how far your changes have moved the stereo image, and the readout shows how far the correlation has moved.
- 4DICE (Randomize): rolls a new set of imaging settings at random, for instant ideas.Tip DICE is safety-first, so it's a quick way to find a new width idea. Check the correlation meter after each roll.
- 5A / B: stores and recalls two full parameter states, to compare two versions of your settings.
- 6Save / Load: save your own presets to disk, or load them back. The snapshot is saved with them.
Stereo image
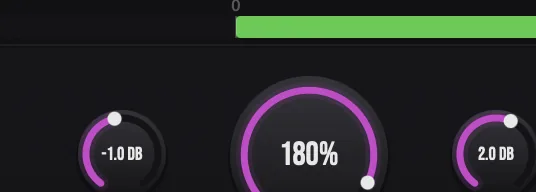
- 11Mid: boosts or cuts the center of the stereo field.−12 to +12 dBTip To make a sound feel wider without raising the side, try cutting Mid a little: the center drops back and the stereo content stands out.
- 12Width: 0% is mono, 100% leaves the sound unchanged, and above 100% Flarex widens it with all-pass decorrelation that still sums cleanly to mono. Up to 100%, the width follows a power-constant law, so the loudness stays steady as you narrow or widen.0 to 200%Tip If the width eases back on its own, that's the Phase-Lock Sentinel: it pulls the width toward 50% when the correlation gets risky, and restores it once the phase recovers. To lift a chorus without touching level or EQ, automate Width a little narrower in the verses and wider in the choruses, and keep Bass Mono on so the low end stays tight at every width.
- 13Side: boosts or cuts the stereo (side) content on its own.−12 to +12 dB
Low end and output
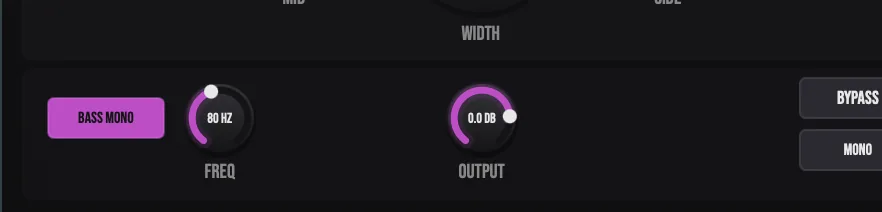
- 14Bass Mono: folds the side content below the Freq setting to mono with a Linkwitz-Riley crossover, so the low end stays tight and centered while the rest stays wide. It crossfades on and off without clicks.On or offTip Turn on Bass Mono whenever you widen a full-range sound past 100%, so the low end stays centered and club-safe.
- 15Freq: the crossover frequency for Bass Mono: everything below it goes to mono.20 to 500 HzTip Start Freq low and raise it until the kick and bass feel solid in the center, then stop. Everything above Freq keeps its width.
- 16Output: the level leaving Flarex, for an honest comparison against the bypassed sound.−24 to +6 dB
- 17Bypass: a crossfaded bypass, so you can compare against the dry signal without a click.
- 18Mono (Mono Check): collapses the sound to mono so you can check how the mix holds up. It is for monitoring only and doesn't change your printed output. It crossfades, so it doesn't click.Tip Flip Mono on and off while you set Width. If a part drops out or thins in mono, pull Width back.
Meters and displays
- 7IN meters: the left and right input levels.
- 8Vectorscope and Cloud Density heatmap: a real-time Lissajous display of the stereo image, marked M, S, L and R. Inside it, a 128 by 128 density map shows where the energy sits: teal for side-heavy, orange for mid-heavy. After you press SNAP, the snapshot shows here as a ghost overlay.
- 9OUT meters: the left and right output levels.
- 10Correlation meter: the phase correlation from −1 to +1, with a status light: MONO SAFE, CAUTION or RISK.
Key specs*
| Width | 0 to 200%: power-constant mid/side scaling up to 100%, six-stage all-pass decorrelation above |
|---|---|
| Mid and Side gain | −12 to +12 dB each, 20 ms smoothing |
| Bass Mono | Linkwitz-Riley crossover (2nd order), 20 to 500 Hz |
| Phase safety | Phase-Lock Sentinel eases the width back toward 50%; Deep-Dive Hard Mute collapses to mono on severe phase inversion, with a 10 ms crossfade |
| Output | −24 to +6 dB, hard limiter on every output sample |
| Correlation meter | −1 to +1, MONO SAFE, CAUTION or RISK |
| Heatmap | 128 x 128 Cloud Density, inside the vectorscope |
| Toggles | Bass Mono, Mono Check, Bypass and preset changes are crossfaded |
| Factory presets | 11 |
* Key specs from the plugin page. Some specs may not be listed.
Mid/side and bass mono
Flarex splits stereo audio into mid (center) and side (stereo difference), then folds the side’s low end to mono below a crossover you set with the Freq knob. The diagram shows how the signal flows through the mid/side matrix and the bass-mono crossover.
How do I widen a pad and keep the low end mono with Flarex?
- Load it. Put Flarex on a pad or synth track and pick the Wide Pads preset, or start from Init.
- Widen it. Turn Width above 100% until the pad feels as wide as you want.
- Center the lows. Turn on Bass Mono and set Freq so the low end of the pad sits in the middle.
- Balance center and sides. Use Mid and Side to bring the center forward or push the stereo content.
- Check mono. Watch the correlation meter, then press Mono to hear how the pad holds up when summed.
- Compare. Match the level with Output and press Bypass to compare against the original.
How do I compare my stereo image before and after with Flarex?
- Load it. Put Flarex on the bus or track you want to check.
- Take a snapshot. Press SNAP. Flarex captures the density heatmap and the correlation, and keeps them in the vectorscope as a ghost overlay.
- Make your changes. Adjust Width, Mid, Side and Bass Mono.
- Compare. Watch the live heatmap against the ghost overlay, and read how far the correlation has moved. Use the GHOST slider to make the overlay easier to see.
- Check mono. Press Mono to hear how the new image holds up in mono.
- Keep both versions. Use A / B to store the old and new settings and flip between them.
What about Flarex Raw?
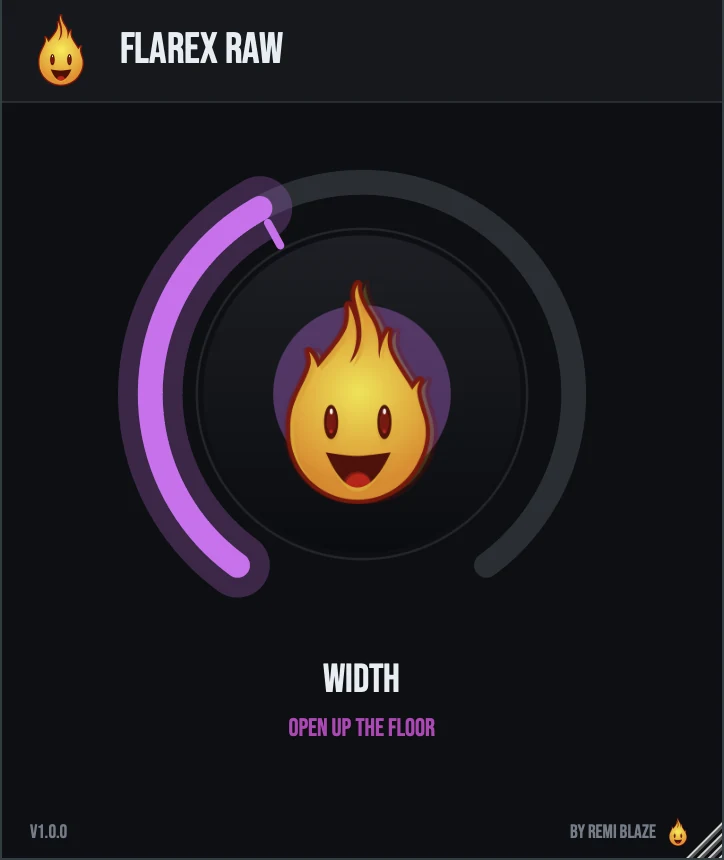
Flarex Raw is the free one-knob version. Its WIDTH knob spreads synths, pads and vocals across the stereo field, while an always-on bass-mono crossover at 120 Hz keeps the low end centered and the same phase safety net pulls the width back if needed. It reports zero latency. Its own manual: Flarex Raw manual.
Flarex vs. Flarex Raw
A side-by-side look at what each version includes.
| Feature | Flarex | Flarex Raw |
|---|---|---|
| Presets | Included | Not included |
| Output level | Included | Not included |
| Mono check | Included | Not included |
Keyboard and mouse shortcuts
These work in every Flarex format (AU, VST3, CLAP, AAX, Standalone).
| Reset a control to its default | Double-click the knob or slider |
|---|---|
| Scroll to change a value | Hover over a knob and scroll the mouse wheel |
Frequently Asked Questions
Which Width setting leaves my sound unchanged?
100%. Below that, Flarex narrows the image down to mono at 0%. Above it, Flarex widens up to 200%.
Why did the width ease back on its own?
That's the Phase-Lock Sentinel. When the correlation drops into risky territory it pulls the width toward 50%, and it restores it smoothly once the phase recovers.
Does Mono Check change my bounce?
No. Mono Check is for monitoring only and doesn't change your printed output.
What do MONO SAFE, CAUTION and RISK mean?
They are the color-coded status of the correlation meter, which reads from −1 to +1, so you can see at a glance how safe the stereo image is before you check it with Mono.
What is the difference between SNAP and A / B?
A / B stores two full parameter states you can switch between. SNAP captures the stereo image itself and shows it as a ghost overlay in the vectorscope, so you can see how your changes moved it.
Where can I find more about Flarex?
On the Flarex page: its features, system requirements and how to get it.
How do I get and install Flarex?
- Get it. Flarex is free. Get it from the Flarex page.
- Run the installer. On macOS, double-click the .pkg file and choose AU, VST3, CLAP, AAX or Standalone. On Windows, run the .exe installer and choose VST3, CLAP or Standalone.
- Open your DAW. Restart your DAW and rescan plugins if needed, then find Flarex under Remi Blaze in your plugin list.
More about Flarex, including its features and system requirements, is on the Flarex page.
Where are the plugin files?
If you need to find Flarex on disk, for example to troubleshoot or to uninstall it manually, these are the standard locations.
| macOS AU | ~/Library/Audio/Plug-Ins/Components/ |
|---|---|
| macOS VST3 | ~/Library/Audio/Plug-Ins/VST3/ |
| macOS CLAP | ~/Library/Audio/Plug-Ins/CLAP/ |
| macOS AAX | /Library/Application Support/Avid/Audio/Plug-Ins/ |
| Windows VST3 | C:\Program Files\Common Files\VST3\ |
| Windows CLAP | C:\Program Files\Common Files\CLAP\ |
To uninstall, quit your DAW and delete the Flarex file from the relevant folder. Your DAW will stop listing it on its next rescan.
Need help with Flarex?
If something isn't covered here, or Flarex doesn't behave as described, contact support or email support@remiblaze.com. To get an answer faster, include:
- your operating system and version (for example macOS 15.6 or Windows 11)
- your DAW and its version
- the format you're using (AU, VST3, CLAP, AAX or Standalone)
- the Flarex version, shown in the About panel (click the Fire Head)
- what you did, what you expected, and what happened instead
This manual is for Flarex 1.1.4. Controls and settings can change between versions, so if something here doesn't match what you see, check which version you have: click the Fire Head to open Flarex's About panel. Spotted a mistake or have a question? Let us know.