What is Gaugex?
Gaugex is a free loudness meter for Mac and Windows. It sits on your master bus and measures loudness in LUFS, true peak, dynamic range and the stereo image to ITU-R BS.1770-4 and EBU R128, then shows at a glance whether your track hits the target you chose and how many dB you are away from it.
The metering runs on a copy of your signal, so by default your audio passes straight through untouched. Gaugex also has optional level tools: a gain trim, a Match button that sets the trim to hit your target, and a true-peak ceiling. They stay off or neutral until you use them.
How does loudness metering work?
Loudness metering measures how loud audio sounds to a listener, not just how high the waveform peaks. The standard used by Gaugex, ITU-R BS.1770, applies K-weighting, a filter that rolls off the lows and boosts the highs to match human hearing, then averages the result over time. The unit is LUFS (Loudness Units relative to Full Scale).
Integrated loudness is the average over everything measured so far, gated so that silent passages do not pull the number down. Short-term (3 seconds) and momentary (400 ms) readings follow the music as it plays. True peak uses oversampling to catch the peaks that fall between samples, which sample-peak meters miss.
Quick start
Get a result with Gaugex in under a minute.
- Insert it. Put Gaugex as the last plugin on your master bus.
- Pick a target. Choose a platform in the Platform Target menu, for example Club/DJ (−6 LUFS).
- Play the track. Play from start to finish so the meters read the whole file.
- Read the result. Check Integrated and Gain to Target to see how far off you are. Press MATCH for a level-matched listen.
- Check before you export. Look at True Peak, PLR, Low Phase and Mono Compat before you bounce.
The interface
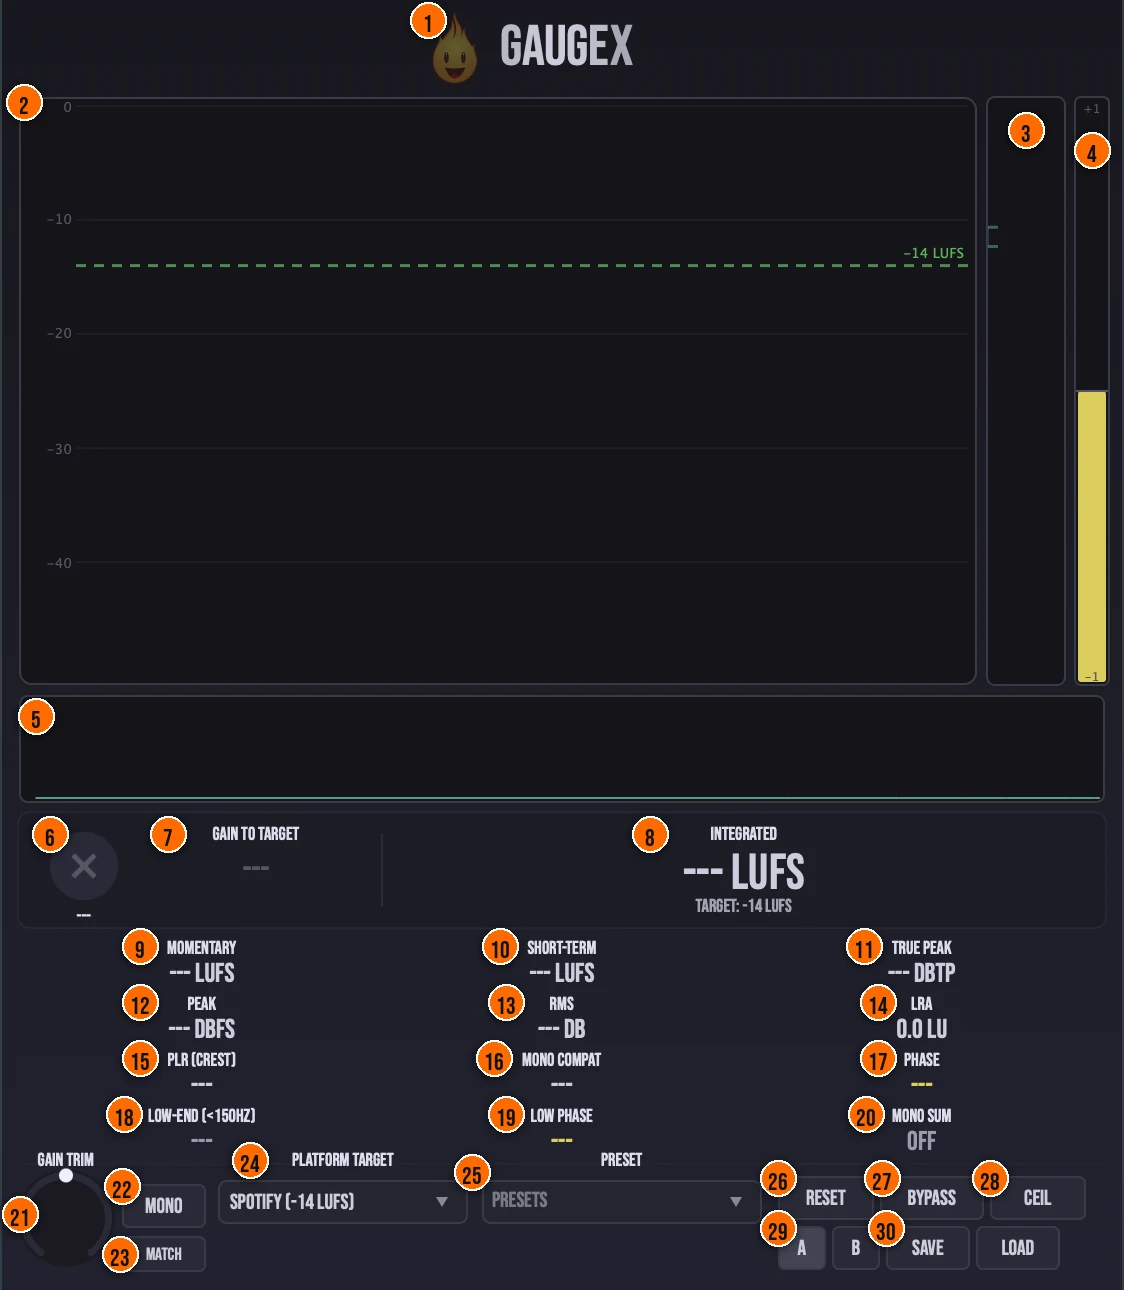
Controls
Top bar
- 1Fire Head: click the flame logo to open the About panel: what the plugin is, who made it, its version and the trademark notices. Click anywhere in the panel to close it.
Target and presets
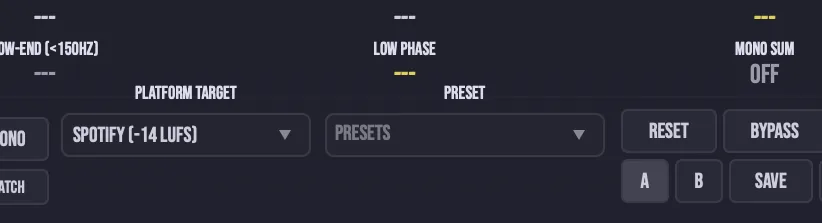
- 24Platform Target: the loudness goal Gaugex checks against. The menu lists common streaming platforms by name* with their targets, plus Club/DJ, Broadcast and a Custom goal. The Integrated readout shows the target you chose. *The platform names are trademarks of their respective owners. Gaugex is not affiliated with or endorsed by them; the names indicate loudness targets only.−14 or −16 LUFS for the streaming platforms, Club/DJ −6, Broadcast −23, or CustomTip Choose the target for the platform you are delivering to. Club and DJ masters are louder (around -6 LUFS); streaming targets sit around -14.
- 25Preset: 15 built-in target and mastering presets, from Streaming Ready and Club Dominance to Broadcast, Final Render Audit and Remi Blaze Master, to jump straight to the right target.
- 29A / B: store two gain, platform and target setups and flip between them instantly.
- 30Save / Load: export your own setups as .gaugexpreset files, or recall them.
Level tools (optional)

- 21Gain Trim: adjusts the level in place, for an honest level-matched comparison. It is a transparent trim that never colors the tone, and it is neutral by default.−24 to +24 dBTip Use Gain Trim for a level-matched comparison: adjust it so Integrated lands on target, then bypass to hear the difference at the same loudness.
- 22MONO (Mono-Sum monitor): sums the left and right channels below 150 Hz, with 3 dB of level compensation, so you can hear how the low end holds up in mono. The meters stay on the stereo signal.Tip Switch on MONO before you bounce to check how the low end holds up on mono speakers. The meters stay on the stereo signal, so the readouts are not affected.
- 23MATCH: one click sets Gain Trim so the track hits your chosen target, based on the Integrated reading.Tip Press MATCH after a full playback to set Gain Trim automatically. It reads the Integrated number and calculates the offset.
- 28CEIL (ISP Ceiling): an opt-in true-peak ceiling at −1 dBTP, for safe delivery. It is off by default.Tip Turn on CEIL only when you need a true-peak ceiling for delivery. It clips at -1 dBTP. Leave it off when you just want to measure.
Reset and bypass
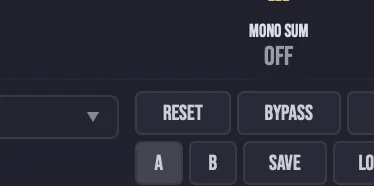
- 26RESET: clears the measurements, for a fresh reading.Tip Press RESET before a full-track play so the Integrated reading starts fresh. A stale measurement from an earlier section will pull the number off.
- 27BYPASS: bypasses the gain trim. Metering stays active.Tip BYPASS turns off the gain trim but keeps metering active, so you can compare the trimmed and untrimmed output while still watching the meters.
Meters and displays
- 2Loudness history: a scrolling graph of your loudness over time, with a dashed line at your target, so you can watch it walk toward the goal. Click or drag on the graph to set a custom target.
- 3Level meter: a stereo level bar with peak hold.
- 4Phase correlation meter: the phase correlation between the left and right channels, as a vertical bar from −1 to +1. It pulses when the signal is out of phase.
- 5Spectrum analyzer: a real-time display of your mix's frequency balance, from 20 Hz to 20 kHz on a logarithmic scale.
- 6Pass/fail check: shows whether your integrated loudness is on target.
- 7Gain to Target: how many dB to move to hit your target.
- 8Integrated: the gated integrated loudness of everything Gaugex has measured, in LUFS, with your target below it. Play the whole track for a full reading.
- 9Momentary: loudness over a 400 ms sliding window, in LUFS.
- 10Short-term: loudness over a 3 s sliding window, in LUFS.
- 11True Peak: the peak level including the peaks between samples, found with 4x oversampling, in dBTP.
- 12Peak: the sample peak, in dBFS.
- 13RMS: the average level, in dB.
- 14LRA: the loudness range: how dynamic your material is, measured to EBU R128 (the spread between the 10th and 95th percentile of the gated short-term loudness), in LU.
- 15PLR (Crest): the peak-to-loudness ratio: how much dynamic headroom remains.
- 16Mono Compat: the difference between the stereo and the mono loudness, for checking mono compatibility.
- 17Phase: the phase correlation between the left and right channels.
- 18Low-End (<150 Hz): the share of low-frequency energy in the total, for checking the bass balance. Gaugex also flags problem energy building up in the sub.
- 19Low Phase: the phase correlation of the low end. The SUB CANCEL flag shows low end that cancels when the mix is summed to mono.
- 20Mono Sum: shows ACTIVE while MONO is on, and OFF otherwise.
Key specs*
| Standard | ITU-R BS.1770-4 / EBU R128: K-weighting, gated integration |
|---|---|
| Loudness | Integrated (gated), Short-term (3 s), Momentary (400 ms) |
| True peak | 4x oversampled, in dBTP; sample peak in dBFS |
| Loudness range | EBU R128 / Tech 3342 |
| Targets | −14, −16, Club/DJ −6, Broadcast −23 LUFS, or Custom |
| Gain trim | −24 to +24 dB, neutral by default |
| ISP Ceiling | −1 dBTP, off by default |
| Signal path | Metering runs on a copy of your signal; untouched by default |
| Factory presets | 15 |
* Key specs from the plugin page. Some specs may not be listed.
How does the sound flow through Gaugex?
A simplified view of the main path.
Metering runs on a copy of your signal, so the audio passes through untouched by default. The level tools stay off until you use them.
Reading the meters
The figures below use example readings to show what each number tells you. Your own material will read differently.
Peak vs average
Two clips can peak at the same level and still be far apart in loudness. A sparse clip has space between its hits, so its average stays low. A dense loop fills that space, so its average sits much closer to the peak.
Gaugex works out PLR as True Peak minus Integrated loudness, so the same peak with a higher average gives a smaller PLR. RMS rises the same way, since it is an average too. The PLR readout is teal from 6 to 14 dB, orange below 6 dB (heavily limited) and yellow above 14 dB (very dynamic).
One clip, four readings
Each meter answers a different question about the same audio. These four readings come from one clip.
True Peak sits near the top because it follows the highest point, including the peaks between samples. RMS and Short-term sit lower because they average over time, and Short-term also weights the frequencies the way the ear hears them. Phase is not a level: it shows how alike the left and right channels are.
Loudness normalization
Many playback systems play every track at the same loudness. A master louder than the playback target is turned down by the difference, so the extra loudness never reaches the listener.
All three play back at the same loudness. Master A gave up the most dynamics to be loud and gains nothing for it. Set the Target to the one you deliver to, and Gain to Target shows the gap.
How do I check a master against a club target?
- Load it last. Insert Gaugex as the last plugin on your master bus.
- Pick the target. Choose Club/DJ (−6 LUFS) in the Platform Target menu.
- Measure the whole track. Play the track from start to finish, then read Integrated.
- See the gap. Gain to Target shows how many dB to move. Make the change in your mix or mastering chain, or press MATCH to set Gain Trim for a level-matched listen.
- Check the peaks and headroom. Watch True Peak, and PLR for how much headroom is left. Turn on CEIL for a −1 dBTP true-peak ceiling if you need one.
- Check the low end. Look at Low Phase and Mono Compat before you export, so the bass holds up in mono.
How do I level-match two mixes to compare them fairly?
- Load the first mix. Put Gaugex on your master bus, pick a target, and play the first mix from start to finish.
- Match it. Press MATCH so Gain Trim brings the integrated loudness to the target.
- Note the trim. Read the Gain Trim value, or store the setup in A.
- Load the second mix. Switch to the second mix, press RESET and play it from start to finish.
- Match it too. Press MATCH again, or store this setup in B.
- Compare. Flip between A and B. Both mixes are now at the same integrated loudness, so the comparison is about tone and balance, not volume.
How do I compare my mix against a reference track fairly?
- Set a target. Put Gaugex on your master bus and pick a loudness target.
- Measure the reference. Play the reference track from start to finish, then press MATCH so Gain Trim brings the integrated loudness to the target. Store this in A.
- Reset. Press RESET to clear the meters before the next pass.
- Measure your mix. Play your mix from start to finish. Press MATCH again and store this in B.
- Compare at equal loudness. Flip between A and B. Both are level-matched, so you hear differences in tone and balance, not just volume.
What about Gaugex Raw?
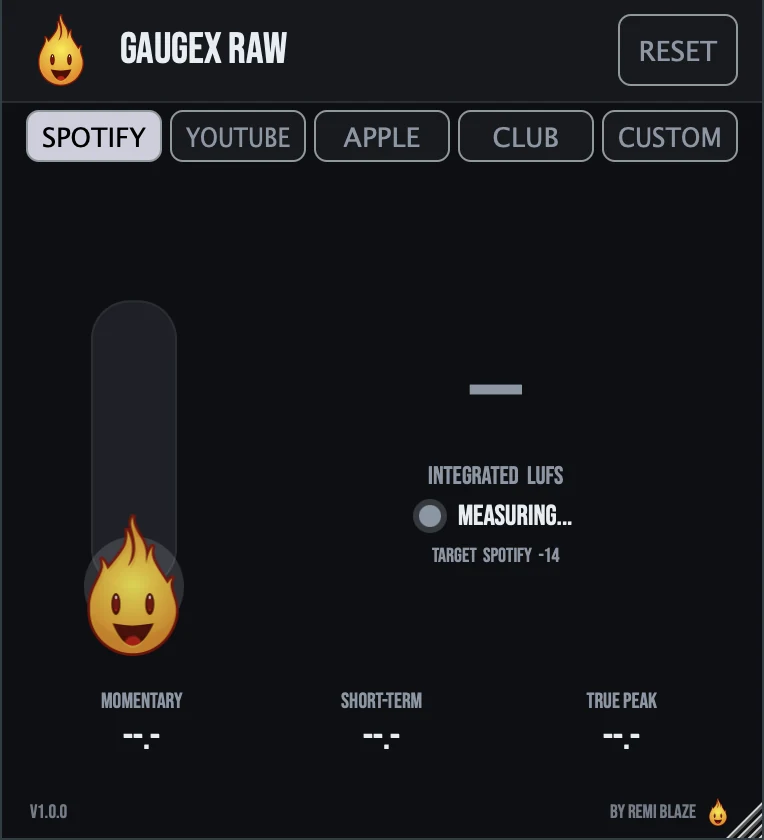
Gaugex Raw is the free single-readout version. Its one control is the target: streaming targets of −14 or −16 LUFS, Club/CD −9, or a Custom value from −24 to −6 LUFS. A large integrated LUFS readout and an on-target light show when you've landed: green within ±1 LU, amber within 3 LU, red beyond. It adds momentary, short-term and true peak readouts, measures only, and reports zero latency. Its own manual: Gaugex Raw manual.
Gaugex vs. Gaugex Raw
A side-by-side look at what each version includes.
| Feature | Gaugex | Gaugex Raw |
|---|
Keyboard and mouse shortcuts
These work in every Gaugex format (AU, VST3, CLAP, AAX, Standalone).
| Reset a control to its default | Double-click the knob or slider |
|---|---|
| Scroll to change a value | Hover over a knob and scroll the mouse wheel |
| Click or drag on the loudness graph | Set a custom target LUFS |
Frequently Asked Questions
What is the difference between Momentary, Short-term and Integrated?
Momentary follows the last 400 ms and Short-term the last 3 seconds, so they move with the music. Integrated is the gated loudness of everything measured so far, which is the number targets are set against. Play the whole track for an accurate Integrated reading.
What does PLR tell me?
PLR is the peak-to-loudness ratio: the gap between your peaks and your loudness. A larger gap means more dynamic headroom; a small one means the track is heavily limited.
What does CEIL do?
It turns on a true-peak ceiling at −1 dBTP, for safe delivery. It is off by default, so Gaugex only measures until you choose to use it.
What does Mono Compat show?
The difference between the loudness of your mix in stereo and summed to mono. A large difference means parts of the mix cancel in mono; check Phase and Low Phase to find where.
Where can I find more about Gaugex?
On the Gaugex page: its features, system requirements and how to get it.
How do I get and install Gaugex?
- Get it. Gaugex is free. Get it from the Gaugex page.
- Run the installer. On macOS, double-click the .pkg file and choose AU, VST3, CLAP, AAX or Standalone. On Windows, run the .exe installer and choose VST3, CLAP or Standalone.
- Open your DAW. Restart your DAW and rescan plugins if needed, then find Gaugex under Remi Blaze in your plugin list.
More about Gaugex, including its features and system requirements, is on the Gaugex page.
Where are the plugin files?
If you need to find Gaugex on disk, for example to troubleshoot or to uninstall it manually, these are the standard locations.
| macOS AU | ~/Library/Audio/Plug-Ins/Components/ |
|---|---|
| macOS VST3 | ~/Library/Audio/Plug-Ins/VST3/ |
| macOS CLAP | ~/Library/Audio/Plug-Ins/CLAP/ |
| macOS AAX | /Library/Application Support/Avid/Audio/Plug-Ins/ |
| Windows VST3 | C:\Program Files\Common Files\VST3\ |
| Windows CLAP | C:\Program Files\Common Files\CLAP\ |
To uninstall, quit your DAW and delete the Gaugex file from the relevant folder. Your DAW will stop listing it on its next rescan.
Need help with Gaugex?
If something isn't covered here, or Gaugex doesn't behave as described, contact support or email support@remiblaze.com. To get an answer faster, include:
- your operating system and version (for example macOS 15.6 or Windows 11)
- your DAW and its version
- the format you're using (AU, VST3, CLAP, AAX or Standalone)
- the Gaugex version, shown in the About panel (click the Fire Head)
- what you did, what you expected, and what happened instead
This manual is for Gaugex 1.1.1. Controls and settings can change between versions, so if something here doesn't match what you see, check which version you have: click the Fire Head to open Gaugex's About panel. Spotted a mistake or have a question? Let us know.